How to set up a UX repository from scratch as a UX researcher
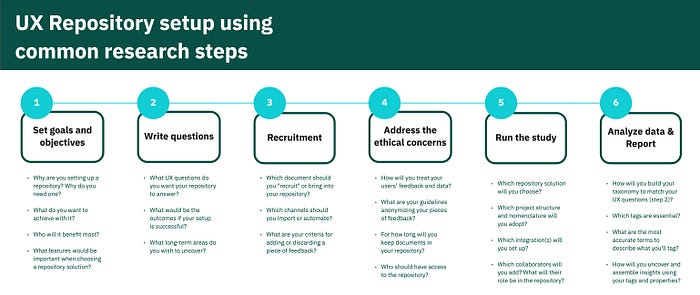
A framework to setup a repository using known and common research steps
In early 2021, I fell in love with Atomic UX Research and started setting up a repository as a UX research team of one. I knew I wanted to centralize my projects and use my repository for continuous discovery research, but I simply didn’t know where to start. It was overwhelming.
Fast forward a few years later after a lot of trials and errors, I finally came up with a framework to set everything up using the skills that we, UX researchers, already own. So if you are in that same overwhelmed state trying to start a repository from scratch: this article is for you. In the next lines, I’ll walk you through a framework in which the setup of the UX repository is treated exactly like something researchers know well: a semi-structured interview project.
What’s a repository?
Simply put, a UX repository is a centralized place to store the UX research work. Whether you go for a broader solution (e.g. Confluence, Air Table), or a specialized tool (e.g. EnjoyHQ, Dovetail), the main objective of a repository will usually be about storing and centralizing all research documents and insights. Most solutions also have key features to navigate these (like a search bar and filters), while only a few have advanced features like analysis tools, built-in taxonomy (tags, properties), automation rules, user segments, etc. I won’t be addressing all the solutions on the market here, but hopefully, this article will give you more clarity on choosing a repository solution.
At the moment, around 40% of companies have a research repository in place according to the NNGroup¹. We are still at the beginning of this practice. So chances are that more and more UX people will get started with repositories shortly, leading current solutions to evolve and grow rapidly too.
Set up your repository as you would set up a UX study
As research people, planning studies, writing questions, and analyzing data are second nature. That’s why I suggest seeing the setup of your repository exactly like a classic semi-structured interview project.
In those research projects, we’ll usually start by writing down our goals, we’ll then write our research plan with questions to ask our participants, we’ll recruit the right people to get relevant answers to our questions, and we’ll look at how we’ll treat the participants’ data. Next, we’ll run the study by meeting with our participants and asking them our questions. Then, we’ll go through the analysis phase and make sense of all the feedback received. And finally, we’ll compose a report to communicate our insights.
The framework I’m suggesting for your UX repository setup follows exactly these same steps.

I’m sure there are multiple other ways to put up repositories. I worked on this one over the last few years because it’s a familiar and known framework for researchers. I’m conscious that it might not fit everyone and/or every UX repository solution on the current market, so feel free to take some and leave some if you wish to.
Set your goals
It would be pretty meaningless to start a UX study without stating the goals of the study and why we are doing it, right? The same applies to a repository. It wouldn’t make sense to set up a UX repository without knowing what the goals and objectives of setting one are. So that’s the first place to start: take a moment to list all your goals in order to have them clear in your mind. Try to answer these questions:
- Why do you need a repository?
- What do you want to achieve with it?
Here are some examples of goals to get past the blank page syndrome:
- Centralize all distinct research projects in one place.
- Organize the different projects without mixing up insights or feedback (e.g. if you work as a consultant for many different clients).
- Centralize all users’ feedback from all channels (e.g. customer support feedback, emails, videos, surveys, NPS, etc).
- Support researchers in their qualitative analysis.
- Encourage collaboration between researchers only.
- Encourage collaboration between researchers, people who do research, stakeholders, and other teams (e.g. development, marketing, sales, etc.).
- Support continuous discovery and find patterns or recurrent themes across all feedback and research projects (e.g. if you work for a single product and aim to evolve it through time).
- Use the repository to socialize/communicate your research insights with your team or clients.
- Etc.
If you haven’t already chosen a solution, this step is crucial to determine which features are truly important for you. For instance:
- If your goals are solely around storage and centralization, you won’t necessarily need an advanced or specialized solution; an organized storage solution could be enough for instance.
- Or if you’re looking to centralize all channels of user data, maybe a tool that offers multiple integrations will be better.
- On the other hand, if your goal is to provide a tool for researchers and help them with qualitative analysis, you might want to go for a specialized tool.
No matter which you choose, keep your goals in mind and try to focus on what you want to achieve with your repository. No matter the solution, my advice here is to seek a solution that allows you to search through all your feedback no matter if it’s tagged or not. Some solutions allow searching only through the tagged feedback. However, this can become a real issue when you’ll have 5000+ pieces of feedback in your repository because let’s be real: you’ll most likely not have the time to tag all 5000+ pieces one by one. That’s why searching without having to tag all documents is essential in my opinion.
Write your UX questions
Once your goals are set, you can move on to writing your questions. In a classic UX study, you’ll write your moderation guide or research plan. You’ll define which questions you will ask your participants and verify that they match your goals and objectives.
Here, we do exactly the same. The idea is to write down your questions to ask your future repository. In other words, this step is about stating what you are looking to learn from your repository and what questions you want to be answered by the repository. If you enjoy collaborative work, this is the perfect moment to invite your stakeholders to share their ideas and vision.
What does it mean concretely? Try projecting yourself in the future, it’s time to be strategic and think long-term. Imagine what are the key outcomes of your repository in an ideal world. A strategy could be to state what you’ll have found if your repository setup is successful, then turn these into UX questions.
For example, I could say that a key outcome would be to finally know the reasons why users are dropping off. When I turn this into a UX question, I get “what are the reasons why my users are dropping off?”.
Here are some examples of UX questions to “ask the repository”:
- Who are my users? Which personas do we have?
- Why are users signing up for my service?
- Why are users dropping off? What are the reasons?
- What are the most requested features of my product?
- What are the main problems with my current set of features?
- What do users value most? Building a new feature or fixing the existing ones?
- What are the links and connections between projects that are unclear at the moment?
- What is the typical journey of my users?
- What are the important elements that impact our key metric or north star?
- Etc.
It seems simple but it is a crucial step. Stating UX questions is essential for the next steps, this step ensures that your repository is focussed and clean.
Recruitment
In a classic UX study, recruitment is the phase where you decide which people you are going to ask your questions to. It’s one of the most important phases because you don’t want to ask the wrong people. Otherwise, your data won’t be valid and reliable.
In our repository context, try to see the recruitment phase like asking your questions to the right piece of user feedback. This is where you are going to decide which document to add to your repository, which channels to import, which feedback to add, and which to discard.
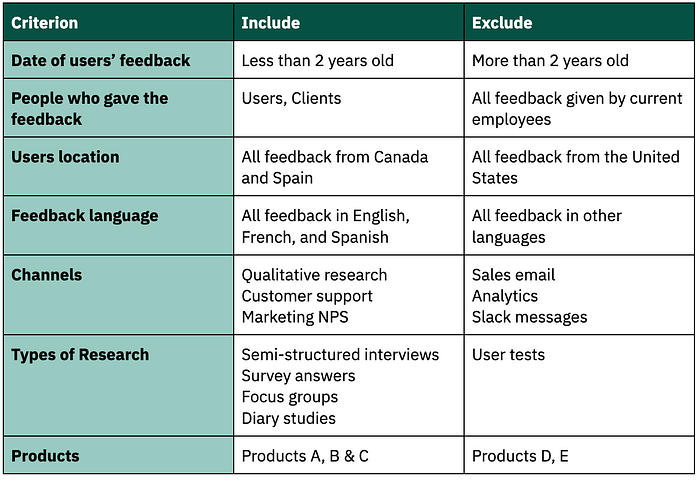
So during this phase of the setup, look at your previously stated goals and questions. Try to identify which channels of data are relevant to import and which are not. See it as the recruitment criteria sheet that we often do as researchers (e.g. “for this study I need 5 people who are located in Canada, who have bought 3 items online in the last 2 weeks, who own a smartphone and a computer, who like to eat toast for breakfast, etc.”).
Try to make a clear list of criteria to help you know what you should add to your repository and what you should leave behind.
Here’s an example:
Ethical concerns
This step clarifies how you will treat the user’s information. It’s similar to explaining to a study participant how their data will be kept and anonymized.
During this phase, try to address as many rabbit holes as possible regarding your users’ feedback, information, or data. Start by listing a set of guidelines about what to do with the different documents you can encounter. As you grow your repository with time, review these once in a while to make sure your guidelines are still on point.
Some areas to think about:
- How much time should you keep users’ data in your repository?
- Which data will you keep specifically and why?
- How to treat names and emails?
- What do you do with feedback that contains sensitive information like phone numbers, home addresses, or credit cards?
- What do you do with feedback from users who are under 18 years old?
- Should all your colleagues have access to the users’ information?
- Do you need to anonymize all content that goes into the repository?
- How will you name your imported documents?
- Which nomenclature is the most relevant to identify different research participants (e.g. “Participant 1”, code name, number)?
- Etc.
Thinking about this might have a big impact on your solution choice as not all tools have the same policies regarding privacy. For this phase, don’t hesitate to connect with the legal department of your company, they are your best allies.
Running the “study”
Finally the fun part! After planning and asking ourselves a ton of questions, it feels good to actually do some hands-on work.
During a classic semi-structured interview project, this phase is where you’ll meet with the study participants, ask them your questions, and gather their feedback. For the repository setup, this is the phase where you’ll “run” everything that you have prepared in the previous phases. It’s the phase where your repository will come to life.
Key elements to do during this phase:
- Choose a repository solution
- Import your users’ feedback and documents in
- Create the structure for your project(s)
- Initiate integrations with other channels
- Add collaborators in
- Set users’ permissions
- If you’ve decided to anonymize all your data or follow a certain nomenclature for naming documents, it’s the moment to do it too
- Etc.
⚠️Note that you can have different strategies in this phase. You don’t have to do all this within a single day. This phase takes time.
Some strategies to consider:
- You can do some steps but wait for others (e.g. import feedback and add collaborators, but wait to set up integrations).
- You can also “play safer” by importing only one simple project to start, working on your taxonomy (see next phase), and then adding more documents to the repository as you become more familiar with it.
- You can put everything in place, work on your taxonomy, and then categorize your imported feedback with it.
- Or you can also skip this part, work on your taxonomy and come back to it later.
Although I suggest that you start small, there is no right or wrong here. The idea here is to go with what you feel the most comfortable with.
Analysis & Reporting
In a classic semi-structured interview project, the last phases are about analyzing data, making sense of them, and communicating the key insights and opportunities. So you’ll go into all your data, start categorizing the different pieces of information, and you’ll identify tendencies to write a report.
In our context, we can see this as the work that has to be done on the repository’s taxonomy. The taxonomy is the set of tags and/or properties that will be used to categorize and analyze all the documents imported into your repository.
To me, this is what makes the magic of a repository. A strong taxonomy is a key to continuous discovery research, uncovering patterns, and finding recurrent themes across all your documents and feedback. It’s also the key to finally getting concrete answers to your UX questions and building strong, reliable insights.
I’m not going to cover how to put together a taxonomy here as it’s a topic on its own. I instead dedicated a whole article about it: How to build a clean taxonomy for your UX repository. Take a look if you need a hand.
Recap
To summarize, the framework presented in this article is all about using common research steps to set up the UX repository from scratch. Feel free to use this cheat sheet when you start working on your repository.
Closing thoughts
Setting up a repository from scratch can be overwhelming, but it doesn’t have to be. Try following the steps you’re already familiar with, trust what you already know, and use skills you already own as a researcher.
Happy repository! ✨
***
References
- Kara Pernice (2022) The State of ResearchOps: Untapped Yet, Norman Nielson Group

